Smartwatch Band Fit Problems for Loose, Tight, and Sliding Straps
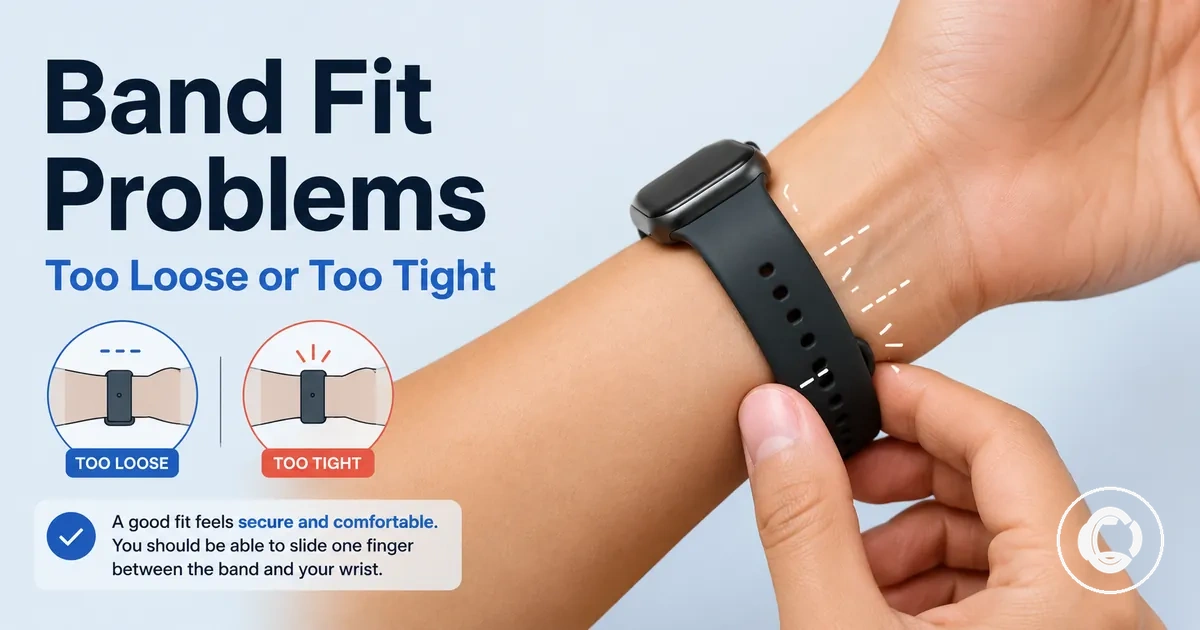
A smartwatch band should stay secure on the wrist without creating painful pressure, pinching, or persistent marks. A secure fit supports normal movement and sensor contact, while still allowing wrist comfort during daily wear. Smartwatch band fit problems usually appear as a loose band, tight band, or sliding strap.
This page focuses on diagnosing band fit before treating the problem as a size, connector, or replacement issue. Strap tension can feel different depending on wrist shape, wrist swelling, band material, activity, and watch design. Secure fit means stable, looseness means movement, and over-tightness means pressure. For broader selection context around smartwatch bands, measurement, compatibility, replacement, and irritation topics are handled only when they help define the fit boundary.
The diagnostic path starts by separating normal snugness from loose movement and excessive pressure. A loose band may slide, rotate, rub, or weaken sensor contact. A tight band may leave pressure marks, pinch, or reduce wrist comfort. The next step is to judge what a secure smartwatch band fit should feel like before diagnosing the loose or tight symptoms in detail.
What a Secure Smartwatch Band Fit Should Feel Like
A secure smartwatch band fit should feel firm on the wrist without sliding, pinching, or losing sensor contact. The watch should stay stable during normal movement, but strap tension should not create sharp pressure or discomfort. The useful test is not exact tightness; it is whether wrist position, movement, and pressure stay balanced together.
The band should sit in a stable wrist position where the watch back can keep contact without needing force. Finger space can be used as a practical comfort check, but wrist shape, activity, material, and device weight can change how snug the band feels. A comfortably snug fit limits rotation, a too loose fit allows sliding, and a too tight fit creates pinching or pressure. Pressure, movement, and sensor contact should be checked together before judging the fit.
The image illustrates secure smartwatch band fit by wrist position, movement control, and pressure balance.
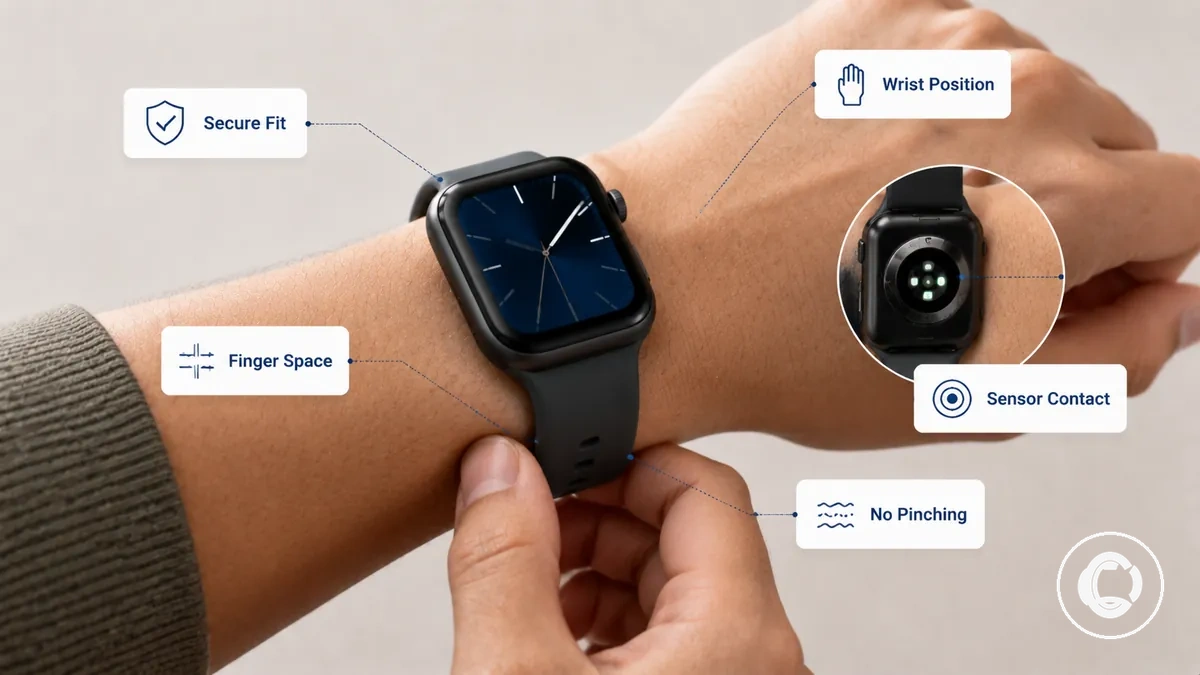
Use this checklist to organize secure fit signals by wrist position, movement, and pressure:
- Wrist position: the smartwatch band should hold the watch in a stable place on the wrist without dropping toward the hand.
- Finger space: a small comfort gap may help check strap tension, but it should not be treated as a fixed measurement rule.
- Rotation: the watch should not rotate freely during ordinary wrist movement, because repeated rotation usually points to looseness.
- Pressure: the band should not pinch, dig in, or create pressure that reduces wrist comfort.
- Sensor contact: the watch back should meet the wrist consistently without using excess tightness as the main way to hold contact.
Finger-space, wrist position, and movement checks
Finger-space, wrist position, and movement checks translate secure smartwatch band fit into visible wrist behavior. A smartwatch band can feel secure when it stays stable during normal use without creating unnecessary pressure. Use these checks as practical indicators rather than increasing strap tension through over-tightening.
Finger space and movement check results are practical fit checks, not exact universal measurements. A passing example may be a watch that remains stable during everyday movement while still feeling comfortable around the wrist bone. A failing example may be a band tightened enough to create pressure simply to stop minor movement.
The image demonstrates how finger space, wrist position, and movement checks help distinguish normal fit behavior from loose or tight adjustment.
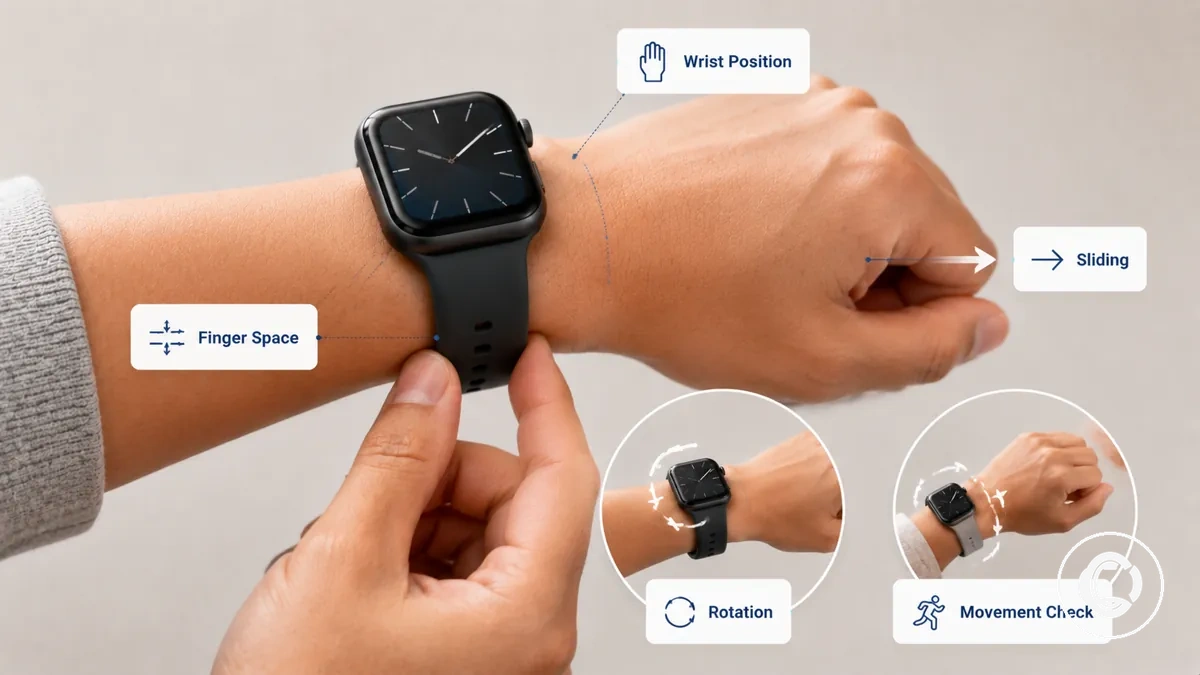
These finger-space, wrist position, and movement checks help separate normal movement from loose or tight fit problems:
- Finger space: a small finger allowance may indicate balanced strap tension, but it should not be treated as an exact rule.
- Wrist position: the watch position should remain comfortably placed near the wrist bone without shifting excessively.
- Sliding: repeated movement toward the hand may suggest looseness rather than a stable fit.
- Rotation: noticeable rotation during ordinary activity can indicate that the band is not holding position consistently.
- Movement check: observe how the watch behaves during normal activity, as fit can change with motion, wrist shape, and band material.
When fit remains uncertain after these practical checks, a more detailed approach to measure band fit may help clarify sizing-related questions.
Sensor contact without excess pressure
Sensor contact should remain stable without relying on excess pressure to hold the watch in place. The watch back should rest against the wrist with consistent contact rather than forceful compression. Stable contact and comfort should work together, and painful pressure is not the right way to maintain sensor contact.
The watch back and sensor area can experience inconsistent contact for reasons beyond strap fit alone. Wrist shape, sweat, and band material may influence how consistently the sensor area meets the wrist during daily wear. Reading stability can sometimes improve with fit adjustments, but inconsistent readings do not automatically mean the band is too loose or too tight.
The image demonstrates how the watch back should meet the wrist without showing or implying excessive compression.
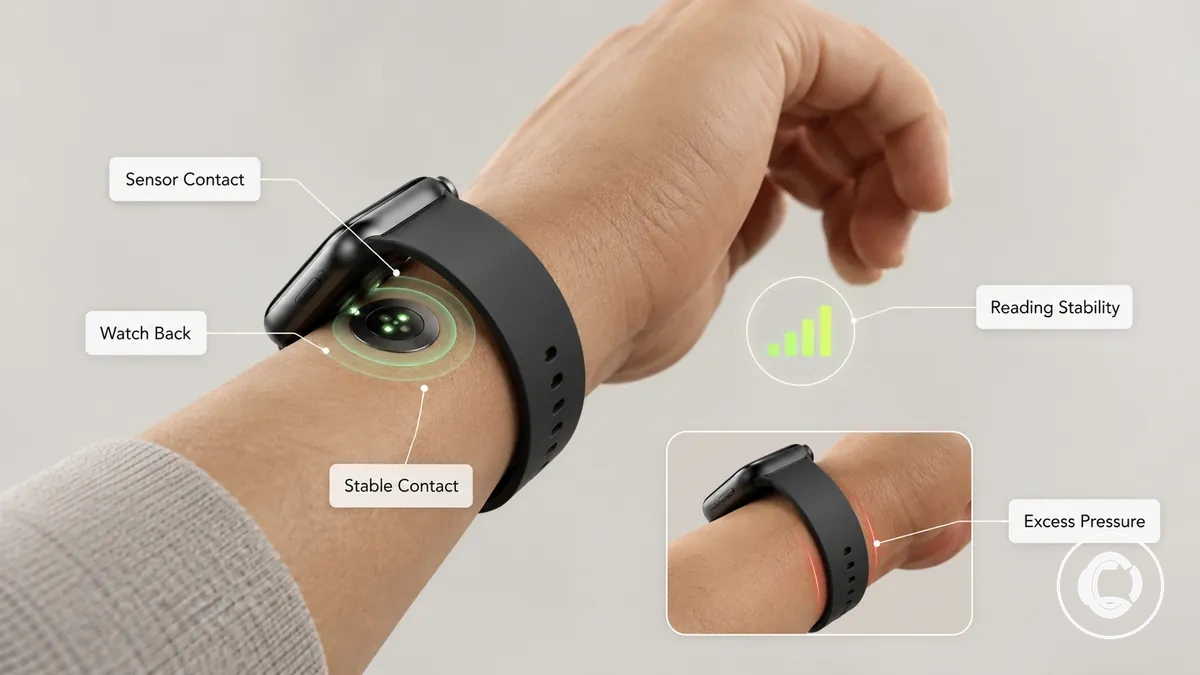
Evaluate contact and comfort together using these diagnostic checks:
- Stable contact: the watch back should maintain contact with the wrist without creating a pressure point.
- Excess pressure: discomfort, pinching, or persistent pressure may indicate that adjustment is needed.
- Contact stability: wrist shape, sweat, and band material may contribute to inconsistent contact in the sensor area.
- Reading stability: inconsistent readings can have multiple causes, so sensor contact should be checked alongside overall comfort.
Why smartwatch band fit changes during the day
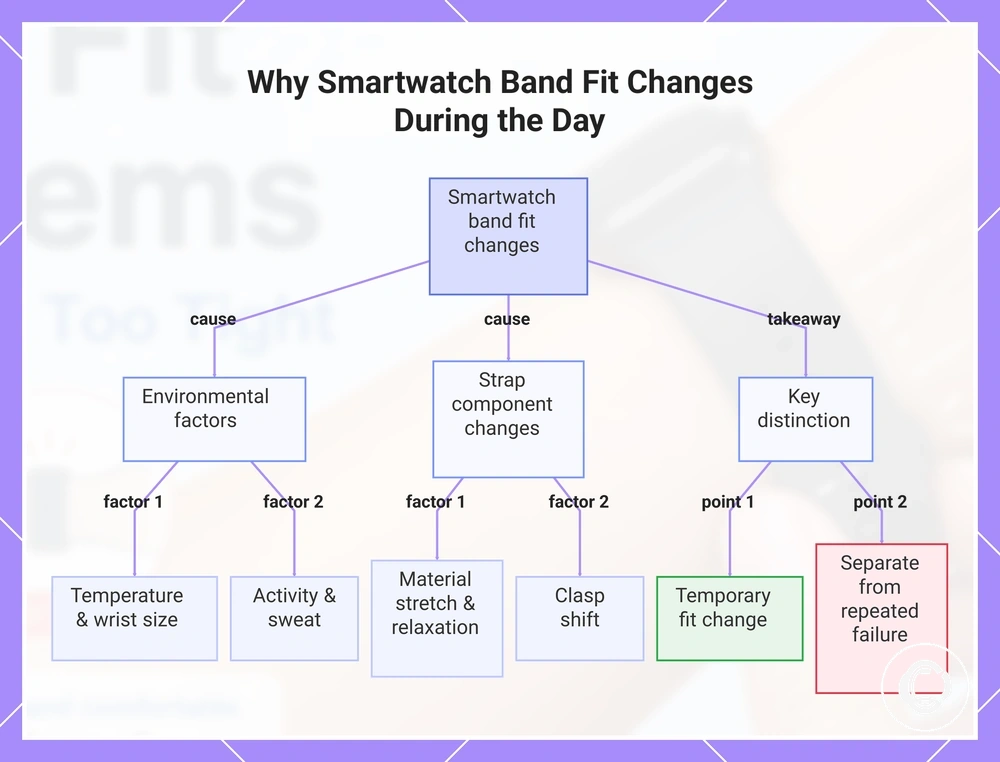
Smartwatch band fit changes can occur because the wrist, strap material, and fastening tension are not static throughout the day. Conditions around the wrist and the band can shift over time, creating temporary looseness or temporary tightness. Daily fit variation often depends on changing conditions rather than a fixed fit state.
Temperature, activity, sweat, and wrist swelling can influence how a smartwatch band feels at different times. A band that feels comfortable in a cool indoor setting may feel tighter after prolonged activity or exposure to heat. Sweat can change how the band sits against the wrist, while wrist swelling may affect perceived strap tension. These factors can contribute to fit changes without indicating a permanent problem.
Strap components can also contribute to fit changes over time. Material stretch, clasp shift, and elastic relaxation may alter fastening tension during wear, depending on band construction and use conditions. For example, the same band may feel slightly loose during a period of lower activity and feel tighter later when conditions around the wrist change. Temporary fit change should be separated from repeated failure before treating the band as defective.
These smartwatch band fit changes are commonly grouped by the following conditions:
- Temperature: changing temperatures may influence wrist size and overall fit feeling.
- Activity and sweat: movement and moisture can affect how securely the band sits on the wrist.
- Wrist swelling: temporary changes in wrist size may create a tighter or looser feeling.
- Material stretch: band materials can experience gradual strap tension change during use.
- Clasp shift: fastening components may move slightly and alter perceived fit.
- Elastic relaxation: elastic bands may loosen temporarily as tension changes during wear.
This chart shows the main causes of daily smartwatch band fit variation and the key distinction between temporary changes and a defective band.
Loose smartwatch band symptoms and causes
When a loose smartwatch band develops, the most common symptoms are sliding, rotation, rubbing, weak contact, or loose fastening during normal wear. These symptoms often appear before a replacement question arises and may be linked to strap length, buckle position, material stretch, clasp security, or wrist shape. A loose smartwatch band should usually be checked and adjusted before being treated as a sizing issue or replacement issue.
The table below links loose smartwatch band symptoms to likely causes, first checks, and safe next steps. Symptoms should be verified before tightening because the same loose feeling can result from different causes.
| Symptom | Likely cause | First check | Safe next step |
|---|---|---|---|
| Sliding | Strap length may be too loose or strap tension may have changed | Check whether the watch moves toward the hand during normal movement | Adjust the fit and reassess before considering sizing changes |
| Rotating | Buckle position or overall fit may not be holding the watch securely | Check whether the watch rotates around the wrist during ordinary activity | Review buckle position and fit balance |
| Rubbing | Repeated movement may be creating friction and discomfort | Check whether the band shifts during wear | Reduce unnecessary movement through fit adjustment |
| Weak sensor contact | Loose strap tension may be affecting wrist contact | Check whether the watch back maintains consistent contact with the wrist | Adjust fit carefully and reassess contact stability |
| Loose fastening | Clasp security, material stretch, or fastening movement may be involved | Check whether the clasp remains securely positioned during wear | Inspect fastening stability before considering replacement |
Band slides, rotates, or drops toward the hand
When a smartwatch band slides, rotates, or drops toward the hand, the band is usually failing to stabilize the watch during normal movement. The cause may be wrist placement, strap tension, clasp position, sweat, band surface, or watch weight. Tightening should not be the default fix because over-tightening can create pressure without solving the movement pattern.
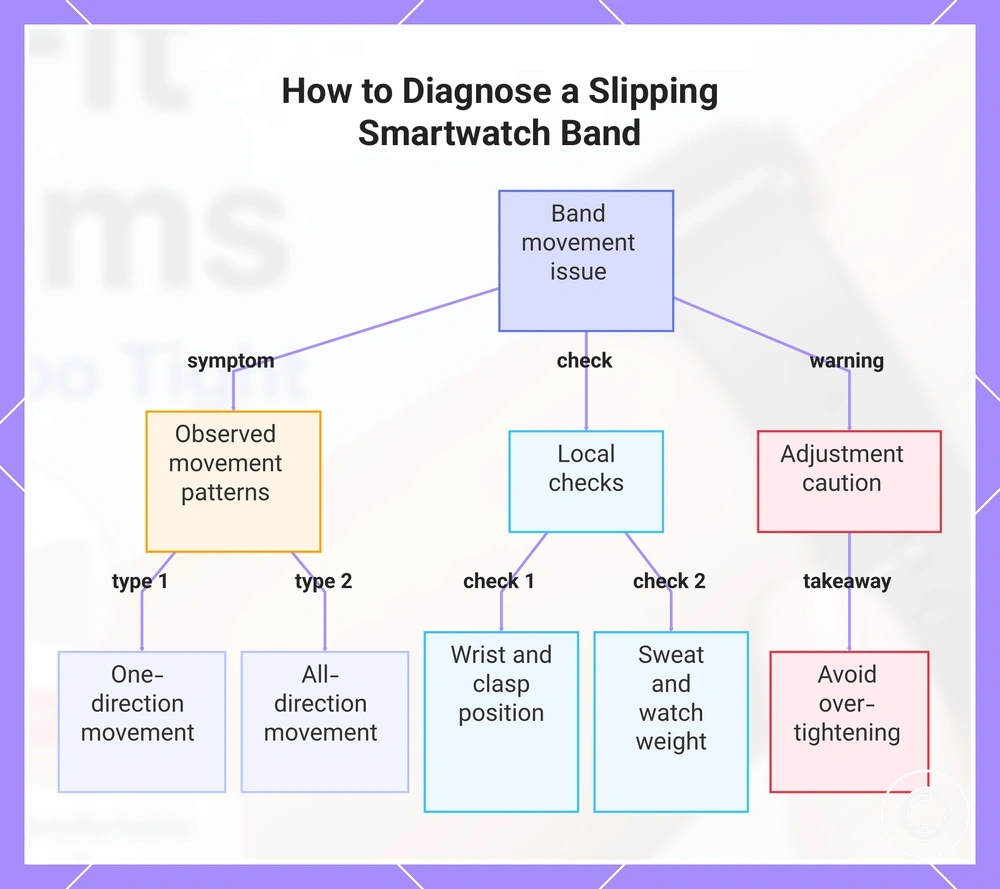
Observe the direction and timing of the movement before adjusting the band. A watch that moves down in one direction may point to wrist placement or clasp position, while a watch that moves in all directions may suggest broader looseness or a surface-friction issue. Activity-related slipping after sweat appears may need a different adjustment than rotation that happens immediately after fastening.
Use these local checks to compare position, tension, and fastening behavior before changing the fit:
- Check wrist placement: observe whether the watch slides below the intended wrist position; this may mean the band is sitting too close to the hand, so move the watch back to a stable wrist position before tightening.
- Check movement direction: observe whether the watch rotates, slips downward, or moves in all directions; one-direction movement may point to placement or clasp position, while all-direction movement may need a small tension adjustment.
- Check sweat and band surface: observe whether slipping increases during activity or after moisture appears; sweat or a smooth band surface may reduce grip, so adjust gradually and reassess movement after the wrist is dry.
- Check clasp position: observe whether the clasp shifts during wear; clasp movement may loosen strap tension, so reseat the fastening and confirm that the band holds position without excessive pressure.
- Check watch weight: observe whether the watch face pulls the band downward during normal movement; a heavier watch may need a more balanced strap position rather than hard tightening.
This chart shows the main movement patterns and local checks to identify the cause of a smartwatch band sliding, rotating, or dropping toward the hand.
Loose fit causes rubbing or inconsistent sensor contact
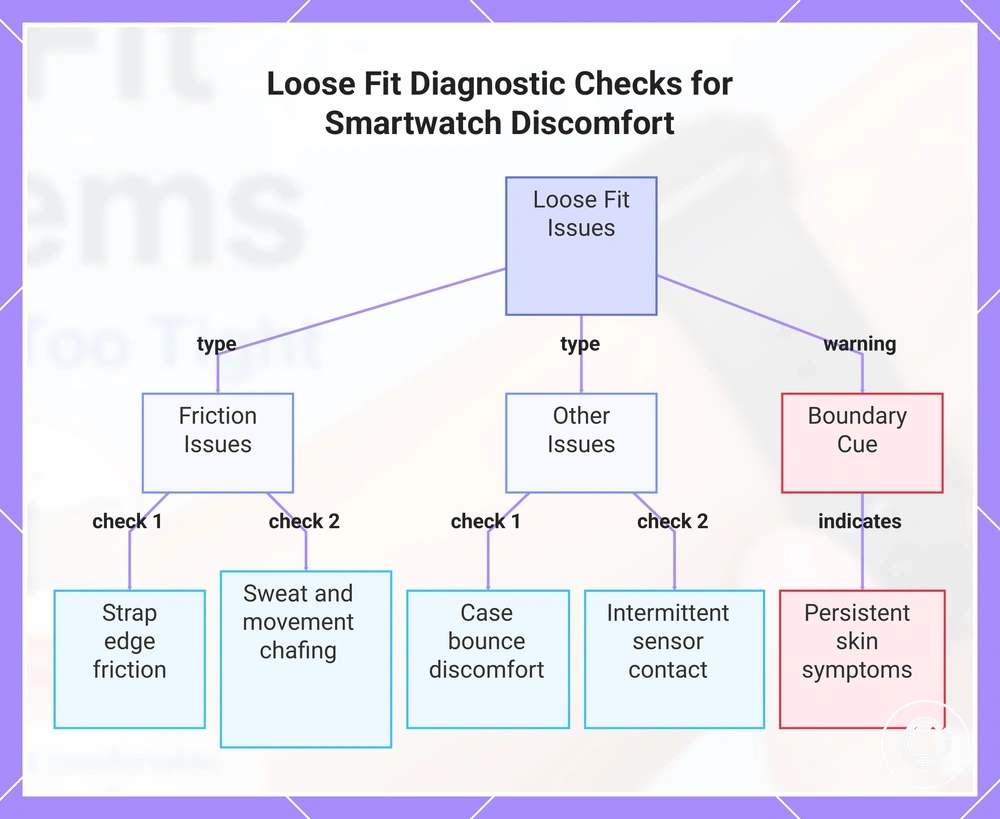
A loose fit can still cause discomfort because the smartwatch case and strap may move repeatedly against the skin. Rubbing or chafing can happen when wrist movement lets the strap edge, case, or band surface shift back and forth. The issue is not tightness alone; movement frequency and repeated contact are often the cause.
Loose fit can also reduce sensor contact when the watch back lifts, bounces, or meets the wrist only intermittently. Sweat, case bounce, strap tension, and band material may change how stable that contact feels during wear. Persistent redness, swelling, itching, or pain should be treated as a boundary cue beyond simple fit adjustment, not as a rash diagnosis.
Use these checks to separate loose fit, rubbing, chafing, and sensor contact issues:
- Rubbing: repeated strap movement may create friction where the band surface or case edge moves against the wrist.
- Chafing: sweat and movement may make strap edge contact feel more noticeable during longer wear or activity.
- Case bounce: a loose watch case may lift and settle repeatedly, which can create discomfort without the band being tight.
- Sensor contact: intermittent contact between the watch back and wrist may contribute to weak sensor contact, so fit should be adjusted carefully without over-tightening.
This chart shows the main types of loose fit issues and the checks to identify them, including a warning about persistent skin symptoms.
Tight smartwatch band symptoms and causes
A tight smartwatch band is usually indicated by pressure marks, pinching, restricted movement, or indentations that do not fade normally after the band is removed or adjusted. These symptoms may be linked to wrist swelling, buckle setting, strap length, material stiffness, or clasp position rather than a single cause. Normal snugness can leave temporary marks, while excessive tightness is more often associated with discomfort or restricted movement. When symptoms become more noticeable, loosening, resizing, changing strap type, or stopping wear temporarily may be appropriate depending on the cause.
The table below separates normal snugness from excessive tightness by linking each symptom to a likely attribute issue and a simple check. The goal is to identify what may be contributing to the tight smartwatch band before making adjustments.
| Symptom | Likely attribute issue | Check | What it means |
|---|---|---|---|
| Pressure marks | Buckle setting or strap tension may be too tight | Check whether marks fade after normal removal or adjustment | Temporary marks may occur with a snug fit, while persistent marks can suggest excessive tightness |
| Pinching | Clasp position or material stiffness may be creating pressure points | Check where the pinching occurs during wrist movement | Localized pressure may indicate an adjustment issue rather than overall fit alone |
| Restricted movement | Strap length or buckle setting may be limiting wrist motion | Check whether normal wrist movement feels constrained | Restricted movement is a visible sign that the fit may be too tight |
| Deep indentations | Excessive tightness or wrist swelling may be increasing pressure | Check whether indentation depth changes throughout the day | Changes may reflect fit variation, activity, or temporary swelling rather than a fixed cause |
| Tightness after activity | Wrist swelling, heat, or material stiffness may affect fit | Check whether the band feels different before and after activity | Fit can change during the day, which may require adjustment rather than a different conclusion about the band |
Pressure marks, indentations, and wrist discomfort
Pressure marks and indentations can help show whether a smartwatch band is simply snug or pressing too hard. A temporary impression after long wear may not mean the band is too tight by itself, but wrist discomfort, pain, numbness, or limited wrist mobility can suggest that fit adjustment is needed. The key distinction is whether the mark fades normally and whether the band affects comfort or movement.
Use mark duration, comfort, wrist mobility, and buckle position as practical fit checks rather than medical proof. These checks help separate temporary pressure impressions from tightness signs that may require loosening or a different fit approach.
This checklist organizes pressure mark severity by duration, comfort, and movement:
- Mark duration: a short-lived pressure mark after long wear may be a temporary impression, while a mark that does not fade normally may suggest excessive pressure.
- Pain or numbness: pain, numbness, or increasing wrist discomfort is a stronger signal to loosen the band or stop wearing it temporarily.
- Wrist mobility: restricted wrist mobility may mean the band is pressing too hard or sitting poorly against the wrist.
- Buckle position: a buckle position that creates a local indentation may need adjustment even if the rest of the strap feels acceptable.
- Long-wear pattern: a mark that appears only after long wear should be judged with comfort, movement, and pressure together before treating it as a serious fit problem.
Red marks that may need irritation checks
Red marks can result from tightness, friction, moisture, material sensitivity, or cleanliness issues, so the cause should be checked before assuming a single fix. Redness may come from pressure during wear, repeated rubbing, sweat buildup, or how the strap material interacts with the skin. Red marks and irritation checks are most useful when they separate temporary fit-related redness from signs that may point to a broader irritation concern.
The checklist below separates pressure signs from irritation signs. Use the checks as practical observations rather than medical conclusions, because redness patterns can depend on wear duration, moisture, strap material, and skin response.
This checklist separates red marks into pressure signs and irritation signs:
- Pressure redness: red marks that appear after wear and fade normally may be linked to tightness or friction rather than irritation.
- Itching: itching that repeats in the same area may suggest that material sensitivity, moisture, or cleanliness should be reviewed.
- Swelling or warmth: swelling or warmth may indicate that the redness is not limited to a simple pressure impression.
- Broken skin: rubbing marks that progress to broken skin are a stronger reason to stop wearing the band temporarily and reassess fit and wear conditions.
- Cleaning state and wear duration: moisture, residue, prolonged wear, and strap cleanliness can influence whether redness becomes more noticeable over time.
If red marks extend beyond fit-related redness or continue to raise irritation concerns, the discussion moves beyond fit troubleshooting and into tight band irritation.
Adjustment methods for better smartwatch band fit
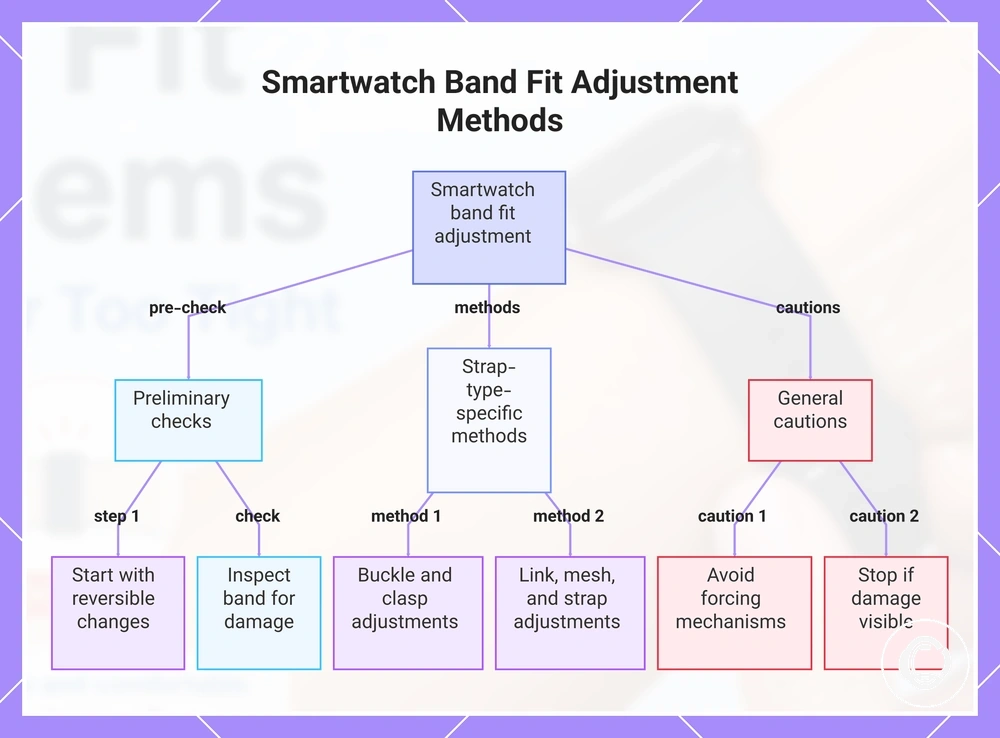
Adjustment methods should start with reversible changes before resizing or replacing the band. Small fit adjustments can often improve comfort, stability, or strap tension without changing the band structure. If the connector, clasp, or strap shows damage, stop adjustment and assess the component condition before making further changes.
The steps below move from simple tension changes to strap-type-specific adjustments. Adjustment methods vary by strap type, fastening design, and component condition.
- Adjust buckle holes: move to the next buckle hole when the band feels consistently loose or tight, then reassess strap tension and comfort.
- Review the clasp setting: check whether the clasp setting can be repositioned to improve fit without creating unnecessary pressure.
- Use micro-adjustment when available: make small fastening changes to refine fit outcome before considering larger adjustments.
- Consider link removal carefully: for link-style bands, link removal may help when the available adjustment range does not provide a comfortable fit.
- Reposition the mesh slider: adjust the mesh slider within its adjustment range to improve wrist fit and fastening balance.
- Check elastic stretch and hook-and-loop overlap: elastic stretch may affect fit over time, while hook-and-loop overlap can often be repositioned to change strap tension.
- Manage excess strap: secure excess strap so it does not shift or interfere with overall fit during wear.
- Start with reversible tension changes: adjust before resizing or replacing the band.
- Match the method to the strap type: buckle holes, mesh sliders, links, and hook-and-loop systems use different adjustment mechanisms.
- Avoid forcing uncertain mechanisms: adjustment can become more difficult when excessive force is applied.
- Stop if damage is visible: a damaged clasp, connector, or strap may require attention beyond fit adjustment.
This chart shows the recommended adjustment process, including preliminary checks, strap-type-specific methods, and general cautions.
Clasp positions, buckle holes, and micro-adjust settings
Clasp positions, buckle holes, and micro-adjust settings change strap tension in small increments that can affect comfort, tightness, or looseness. A small adjustment may improve the fit outcome without requiring larger changes to the band. Because strap tension can feel different depending on wrist shape, material, and activity, a one-setting change may help or may remain insufficient.
Clasp, buckle, and micro-adjust settings change strap tension differently:
- Buckle holes: fastening part = buckle holes; available setting = the next buckle setting; tension change = slightly tighter or looser strap tension; fit outcome = may reduce looseness or pressure when the current setting is close to the desired fit.
- Clasp positions: fastening part = clasp positions; available setting = clasp adjustment range; tension change = a small adjustment in strap tension; fit outcome = may improve comfort when the difference between loose and tight is minor.
- Micro-adjust settings: fastening part = micro-adjust settings; available setting = a micro setting within the fastening mechanism; tension change = a small increment in strap tension; fit outcome = may fine-tune comfort when buckle holes alone are not enough.
- One-setting example: moving one buckle hole or one micro-adjust setting may improve comfort for one wrist condition, but the same tension change may remain insufficient when wrist movement, material behavior, or daily fit variation continues to affect strap tension.
Links, mesh straps, elastic bands, and hook-and-loop limits
Link bracelets, mesh straps, elastic bands, and hook-and-loop closures each have a different adjustment limit. Every strap style relies on a different adjustment mechanism, which affects the available adjustment range, comfort trade-off, and fit risk. When the available adjustment range can no longer support the wrist comfortably, a different strap style may be worth considering.
The comparison below focuses on adjustment range, comfort trade-off, and likely failure point rather than ranking one strap type above another. Adjustment limits can vary by wear, design, and fastening condition.
Strap types can be compared by adjustment range, comfort trade-off, and likely failure point:
| Strap type | Adjustment mechanism | Usable condition | Fit risk / failure point |
|---|---|---|---|
| Link bracelets | Link removal or existing link configuration | Works when the adjustment range still supports the wrist size | Removed links may limit future adjustment options and create fit risk if the remaining range is insufficient |
| Mesh straps | Sliding mesh adjustment | Works when the slider maintains the intended tension | Slipping mesh may reduce tension consistency and affect comfort |
| Elastic bands | Stretch-based adjustment | Works when elastic stretch still provides adequate support around the wrist | Stretched elastic may increase looseness and reduce adjustment effectiveness |
| Hook-and-loop | Overlap and grip adjustment | Works when overlap and grip remain secure | Weak hook-and-loop grip may reduce holding strength and become the failure point |
When the strap length or band size is wrong
Strap length or band size is probably wrong when the band stays too tight or too loose after normal adjustment. A temporary fit change can come from wrist swelling, material stretch, or buckle position, but repeated failure across the available adjustment range points more toward a length mismatch. This separates a normal adjustment problem from a possible size issue.
The table below separates adjustment problems from strap length or band size mismatch using fit signs, size signals, and checks. Exact measuring and size-chart selection belong outside this section.
| Fit sign | Size or length signal | What to check | What it means |
|---|---|---|---|
| Too small | Short strap or limited hole range | Check whether the band stays too tight even at the loosest buckle position | The strap length may not suit the wrist circumference, and an extender or different band size may be needed |
| Too long | Long strap or excess strap after fastening | Check whether the band remains too loose at the tightest usable setting | The band length may exceed the useful adjustment range for the wrist |
| Hole spacing | Hole range does not provide a balanced setting | Check whether one buckle position feels too tight and the next feels too loose | The issue may be adjustment spacing rather than the whole band being wrong |
| Link count | Remaining links do not match the needed fit range | Check whether link count leaves the band too tight or too loose after normal adjustment | The available link configuration may not support the wrist comfortably |
| Stretched elastic | Elastic stretch changes the usable band length | Check whether the band has lost tension and still feels loose after adjustment | The fit problem may come from stretched material rather than wrist circumference alone |
Band too small for the wrist
A band too small usually reveals itself through a limited fastening range or excessive tension during normal wear. When closure becomes difficult, the band reaches the end of its adjustment range, or the wrist remains uncomfortable after fastening, strap length may be the limiting factor rather than a simple adjustment issue. The band should be wearable without ongoing pressure or closure difficulty.
Temporary tightness can sometimes be influenced by wrist swelling, while a short strap or too-short band tends to remain restrictive across normal wear conditions. A band too small is identified by fastening range, tension, and tail length rather than by smartwatch model size.
The visible signs below help separate temporary tightness from a strap-length limitation:
- Last-hole use: if the band requires the last available fastening position and still feels tight, strap length may be insufficient; reassess fit rather than increasing pressure.
- Buckle strain: if buckle strain appears during closure, the fit risk may come from excessive tension; avoid forcing the fastening mechanism and review whether a longer strap is needed.
- Pinching: if pinching occurs during normal wrist movement, the band may be creating excessive pressure; check whether the tightness persists after normal adjustment.
- Insufficient tail length: if very little strap remains beyond the fastening point, the short strap may be operating at its adjustment limit; for example, a longer strap or extender may be safer than continuing to use a band that closes only under noticeable pressure.
- Wrist swelling: if tightness appears mainly during temporary swelling, the condition may not indicate a structural strap-length problem; reassess fit when wrist size returns to its usual state.
Band still too loose after normal adjustment
A band that is still too loose after normal adjustment often indicates that strap length, hole spacing, link count, or material stretch exceeds what the wrist needs. When the band remains unstable at its tightest practical setting, the issue may be an adjustment limit rather than a missed adjustment. Temporary looseness can occur with activity, sweat, or daily wrist variation, while structural looseness tends to persist across normal wear conditions.
Material stretch and adjustment limits can make a loose fit harder to correct through routine tightening alone. Persistent looseness is best evaluated by identifying the adjustment limit, the visible sign, and the safer decision.
- Smallest-hole use: if the band is still too loose at the smallest-hole use position, strap length or hole spacing may exceed the wrist need; consider a shorter strap or a tighter adjustment system.
- Removed-link limit: if a link bracelet remains loose after reaching a practical link count limit, the adjustment range may no longer support a secure fit; a different band style may be the safer decision.
- Elastic fatigue: if elastic bands feel loose after adjustment and no longer maintain consistent tension, material stretch may be contributing to structural looseness; reassess whether the band still provides adequate support.
- Mesh slider slip: if the mesh slider gradually loses position and the watch becomes loose again, the fastening system may not be maintaining the intended setting; a tighter adjustment mechanism may be worth considering.
- Excess tail and watch rotation: if excess tail remains after fastening and the watch continues to rotate around the wrist, strap length may exceed the useful adjustment range; avoid improvised modifications and evaluate whether a shorter strap is more suitable.
Connector, latch, and keeper problems that feel like poor fit
Some smartwatch band problems feel like poor fit even when the real issue is the connector, latch, or keeper. A band can feel loose, unstable, or insecure if latch engagement, adapter fit, spring bar position, or excess tail retention is failing. Wrist fit is about strap tension on the wrist, while watch-end security is about whether the band stays attached and controlled.
The table below separates wrist-fit problems from attachment and retention problems. Use compatibility as a local check for connector width, adapter fit, spring bar or latch engagement, keeper control, and watch-end movement rather than a full compatibility guide.
| Problem felt as fit issue | Attachment part | Check | What it means |
|---|---|---|---|
| Band disconnects or feels unsecured | Latch or spring bar | Check whether latch engagement or spring bar seating holds during normal movement | The issue may be attachment security rather than wrist strap tension |
| Band cannot lock securely | Connector width | Check whether the connector width matches the watch-end opening | A wrong connector width can mimic poor fit because the band may not attach correctly |
| Band shifts at the adapter | Adapter fit | Check whether the adapter fit feels loose or uneven at the watch body | A loose adapter may create watch-end movement even if wrist fit feels acceptable |
| Excess tail moves during wear | Keeper | Check whether the strap keeper holds the excess tail in place | Keeper failure can feel like poor fit because loose tail retention changes how the band sits |
| Watch body wobbles | Watch-end connection | Check whether movement comes from the watch end rather than the wrist section | Watch-end wobble may indicate a connector, latch, or adapter issue instead of a sizing issue |
If the band disconnects, wobbles at the watch body, or cannot lock securely, treat the issue as compatibility and connectors before judging wrist size or strap length.
Band falls off or does not lock into place
A band that falls off or does not lock should be checked as an attachment problem, not merely tightened on the wrist. The connector, latch, and watch-end fit control whether the band stays attached, while wrist tension only controls how the strap sits around the wrist. Stop wearing the watch if repeated disconnection or failed locking could let the watch detach.
Use these local checks to test attachment security through the connector, latch, and watch-end fit before judging wrist size or strap tension.
- Check installation direction: confirm whether the band has been inserted in the correct direction at the connector; if the band does not lock after reseating, stop wearing it until the attachment issue is resolved.
- Check tactile lock: feel whether the latch produces a clear locking response; if the band does not lock or feels uncertain, stop wearing it rather than relying on tighter wrist fit.
- Check the latch and connector width: inspect whether a damaged latch or wrong connector width is preventing secure engagement; if the connection fails under normal movement, stop wearing the band.
- Check the adapter and watch-end fit: observe whether a worn adapter or loose watch-end fit creates movement at the watch body; if repeated disconnection continues, treat it as an attachment problem.
- Check the watch-side connector area: if the band still fails after common connector and latch checks, the watch-side connector area may be damaged; stop wearing the watch until the watch-end fit can be assessed safely.
Strap loop or keeper does not hold excess band length
A loose or missing strap loop can let excess band length move even when wrist tension is otherwise correct. The keeper controls the loose tail after fastening, so poor keeper tension can create a fit-like annoyance without meaning the band is too loose around the wrist. This separates excess strap control from wrist tension.
If tail length remains excessive even with a working keeper, the issue may be band length rather than the strap loop alone.
Excess band length is controlled by keeper position, keeper tension, and strap tail retention:
- Strap loop condition: a stretched, loose, or missing keeper can let the tail move during wear; the strap loop is likely the issue when wrist tension still feels stable.
- Tail length: long tail length can overwhelm normal keeper control; band length may need correction when excess strap keeps shifting despite a working loop.
- Material friction: low material friction can let the strap tail slide through the keeper; the likely issue may be keeper tension or band surface behavior.
- Replacement loop fit: a replacement loop may reduce annoyance when the original keeper no longer grips, but it may not solve movement caused by excessive band length.
- Tail catching during movement: if the loose tail catches or lifts during wrist movement, the keeper may not be holding the excess band length securely; check whether loop fit or strap length is the main cause.
When adjustment is not enough and replacement is safer
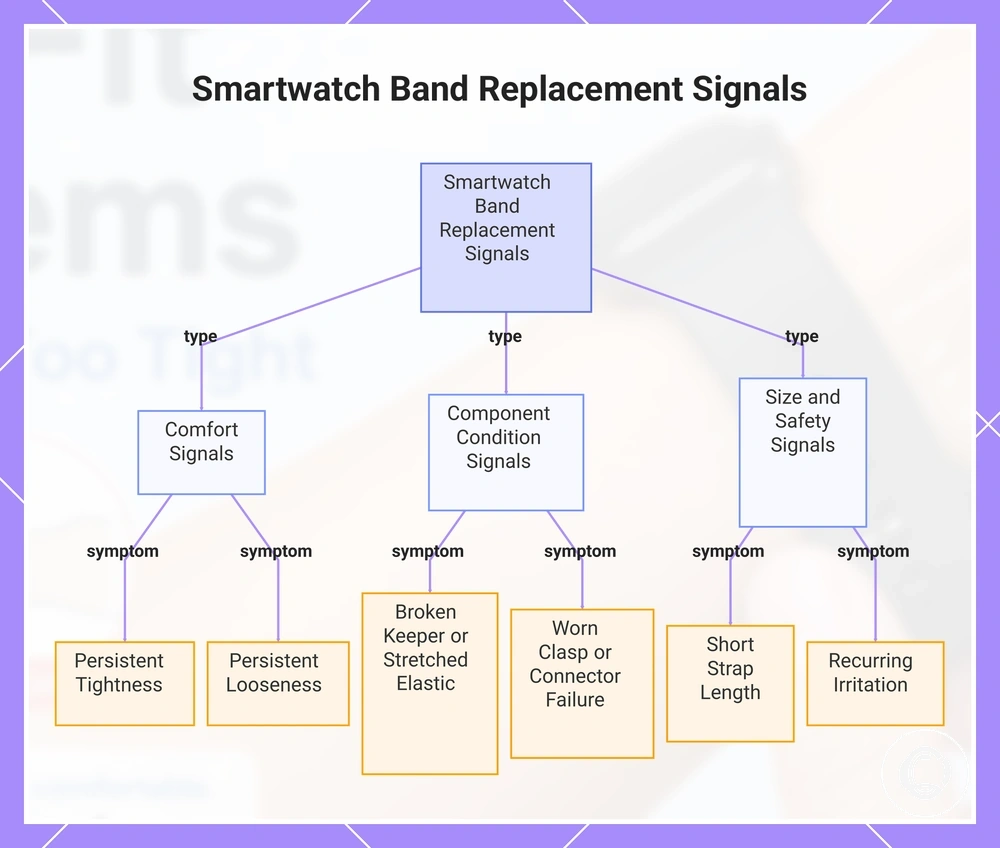
When adjustment is not enough to remove pressure, sliding, damage, or attachment insecurity, replacement is safer than continuing to rely on a band that remains problematic. A failed adjustment does not automatically mean the current smartwatch band must be replaced, but ongoing usability issues can indicate that the band is no longer serving its intended function. The decision should stay focused on whether the current smartwatch band is still usable.
Persistent tightness and persistent looseness are common replacement signals when normal adjustment can no longer provide a stable and comfortable fit. Component wear can also affect usability, especially when a broken keeper, worn clasp, connector failure, or stretched elastic continues to create recurring problems. Short strap length may remain restrictive even after adjustment, while recurring irritation signals may justify reassessing whether the current band remains suitable. These conditions should be evaluated as usability concerns rather than as buying decisions.
The checklist below groups replacement signals by comfort, size, component condition, and safety:
- Persistent tightness: if pressure remains after normal adjustment and comfort does not improve, replacement may be safer than continued use.
- Persistent looseness: if the band continues to slide or rotate despite available adjustments, the current fit range may no longer be adequate.
- Broken keeper or stretched elastic: if excess strap control or tension can no longer be maintained, the band may no longer remain reliably usable.
- Worn clasp or connector failure: if attachment security remains uncertain, stop relying on adjustment alone and treat the condition as a replacement signal.
- Short strap length: if the band remains restrictive across its usable adjustment range, replacement may be more practical than repeated adjustment attempts.
- Recurring irritation signals: if irritation continues despite fit changes and wear adjustments, reassess whether the current band remains suitable for ongoing use.
If the checklist suggests that the current smartwatch band is no longer usable, the next step is understanding how to replace a smartwatch band safely and appropriately.
This chart shows the main categories of replacement signals that indicate when a smartwatch band is no longer usable despite adjustment.